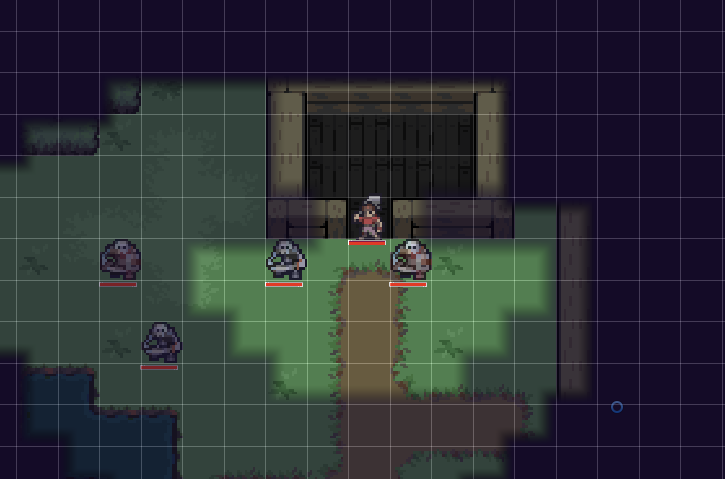
During my earliest prototypes, back in 2017, I decided to use raycasting as the way to go for the fog or vision algorithm.
It was quite simple: You get a “bounding area” around the player character, cast one ray to each tile in the grid, and wall tiles, that required a collider, and if the ray did hit something, it meant the tile was not visible.
insert raycasting image here
Since I intended to add more options to tiles, like allowing them to block light but not movement and vice versa, and avoid having a mesh to the grid, I decided to bake the vision information in a simpler structure.
I assumed the vision will always be relative to the character position. Since light travels in a straight line, it should always come from one adjacent block. If that block is blocked already, by another block, then the current block is blocked as well.
insert image of a single ray being cast and hitting a single tile
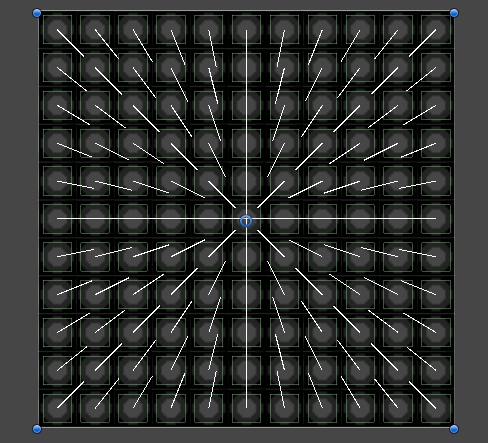
To calculate the adjacency structure, I created a complete mesh, with all tiles blocking light, and launched a ray from each tile towards the central position. The first hit corresponds to the tile that can block the other tile. This “light spread information” was added in reverse to the hit tile, meaning that it can lit the tiles that cast a ray to it.
The result is the following structure:
public struct FogState
{
    public bool visible;
    public bool calculated;
    public bool blocksLight;
    public int[] spread;
}
And the data generated with the parameters I set is the following (in javascript notation for simplification purposes):
{
    12: [0],
    23: [11, 22],
    34: [33],
    45: [44],
    56: [55],
    67: [66],
    78: [77],
    89: [88, 99],
    100: [110],
    13: [1, 2],
    24: [12],
    35: [23, 34],
    46: [45],
    57: [56],
    68: [67],
    79: [78, 89],
    90: [100],
    101: [111, 112],
    25: [13, 14],
    36: [24],
    47: [35, 46],
    58: [57],
    69: [68, 79],
    80: [90],
    91: [101, 102],
    14: [3],
    37: [25, 26],
    48: [36, 47, 37],
    59: [58],
    70: [69, 80, 81],
    81: [91, 92],
    102: [113],
    15: [4],
    26: [15],
    60: [48, 59, 70, 49, 71, 50, 61, 72],
    92: [103],
    103: [114],
    16: [5],
    27: [16],
    38: [27],
    49: [38],
    71: [82],
    82: [93],
    93: [104],
    104: [115],
    17: [6],
    28: [17],
    39: [28, 29],
    50: [39, 40, 51],
    72: [83, 73, 84],
    83: [94, 95],
    94: [105],
    105: [116],
    18: [7],
    29: [18, 19],
    61: [62],
    95: [106, 107],
    106: [117],
    19: [8, 9],
    40: [30],
    51: [41, 52],
    62: [63],
    73: [74, 85],
    84: [96],
    107: [118, 119],
    30: [20],
    41: [31, 42],
    52: [53],
    63: [64],
    74: [75],
    85: [86, 97],
    96: [108],
    20: [10],
    31: [21, 32],
    42: [43],
    53: [54],
    64: [65],
    75: [76],
    86: [87],
    97: [98, 109],
    108: [120],
}
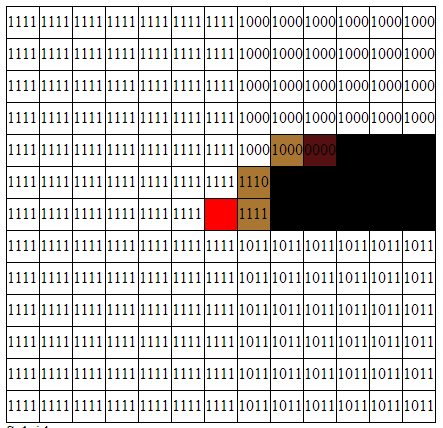
The grid I used was a 11x11 grid, and the tiles indexes are calculated as (x + y*11).
The algorithm then works as follows: You start with the central position, as an always visible tile. Then light spreads to adjacency tiles. Each not-calculated adjacency is then added to the calculation queue. By the end, you have sort of a “flooding” algorithm that will fill all tiles connected to the central tiles by visibility.
private void CalculateFog(int index)
{
    FogState[index].calculated = true;
    // Walls are visible as well
    FogState[index].visible = true;

    if (FogState[index].blocksLight)
    {
        // Will not spread light
        return;
    }

    // Spread light to neighbors.
    for (var i = 0; i < FogState[index].spread.Length; i++)
    {
        if (!FogState[i].calculated)
        {
            fogQueue.Enqueue(FogState[index].spread[i]);
        }
    }
}
And the result is as follows:
I created an interactive version of that algorithm. You can check it here:
https://busta.dev/assets/blog/2020/rogue/fog/
Check the previous posts about the roguelike game:
EDIT (19/01/2020): After posting the previous idea on social networks, a new idea sparked that might improve the visuals of the current algorithm.
Walls are not completely visible. Corners are way too much visible. And so the following idea appeared:
“What about launching beams from the 4 corners of a tile, instead of it’s center?”
That’s what I did, and then… It failed miserably. Since the lit block could be litten by multiple blocks around it, light was warping around some corners indefinetely.
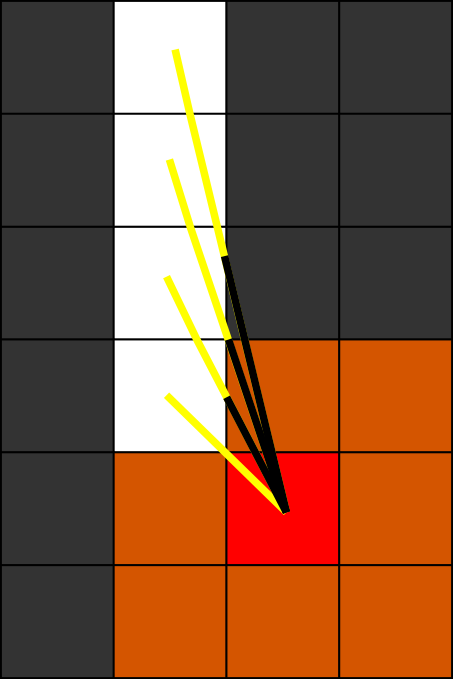
Assuming just the first tile would be enough caused light to behave like a curve since the check for the adjacent tile was being done in a different position.
Making pathes from multiple corners just intensified this effect, as each light path was split into 4 different curves, creating weird unexpected patterns.
Now I need to think of a workaround.